![- 1 cup warm water - 2 ¼ teaspoons active dry yeast - 3 cups all-purpose flour - 1 ½ cups shredded mozzarella cheese The key to my cheesy garlic breadsticks starts with warm water. Use about 110°F to wake up your yeast. Then, mix the yeast with sugar and let it froth for about 10 minutes. This step helps create a soft and fluffy breadstick. Next, I rely on all-purpose flour. This flour gives the breadsticks a great texture. Finally, mozzarella cheese adds the creamy, gooey goodness we all love. - Fresh parsley for garnish - Marinara sauce for dipping Fresh parsley is a simple touch that makes your breadsticks look pretty. It adds a pop of color and a hint of freshness. Marinara sauce is perfect for dipping and adds a nice tang to the cheesy flavor. How to replace all-purpose flour If you want a gluten-free option, use a gluten-free flour blend. This keeps the texture light and fluffy. Alternatives for mozzarella cheese You can use provolone or gouda cheese for a different taste. These cheeses melt well and offer a unique flavor twist. Using garlic powder instead of fresh garlic If you don’t have fresh garlic, garlic powder works fine. Use about 1 teaspoon of garlic powder for each clove. This gives your breadsticks that great garlic flavor without the fuss. For the full recipe, check out the [Full Recipe]. To start, we need to activate the yeast mixture. In a small bowl, mix one cup of warm water, 2 ¼ teaspoons of active dry yeast, and one teaspoon of sugar. Let this sit for 5 to 10 minutes. You will see it foam up, which means your yeast is alive! Next, combine 3 cups of all-purpose flour and one teaspoon of salt in a large mixing bowl. Make a well in the center. Pour in your yeast mixture along with 2 tablespoons of olive oil. Mix until a dough forms. Now, knead the dough on a floured surface for about 5 minutes. You want it to feel smooth and elastic. This step is important for the right texture. After kneading, place your dough in a lightly greased bowl. Cover it with a kitchen towel. Let it rise in a warm place for about 1 hour. You want it to double in size. Look for a cozy spot like near a warm oven. Once the dough has risen, punch it down gently. Now, roll it out into a rectangle that is about ½ inch thick on a floured surface. This is where the magic begins! Transfer the rolled dough to a baking sheet lined with parchment paper. Use a knife or pizza cutter to score the dough into sticks. Be careful not to cut all the way through. In a small bowl, mix together 3 tablespoons of melted butter, 4 cloves of minced garlic, and 1 teaspoon of dried oregano. Brush this garlic butter mixture generously over the dough. Finally, sprinkle 1 ½ cups of shredded mozzarella and ¼ cup of grated Parmesan cheese evenly on top. Preheat your oven to 425°F (220°C) and bake for 12 to 15 minutes. Look for golden edges and bubbly cheese. Once done, let the breadsticks cool for a few minutes before cutting through the scored lines. Now you can enjoy your cheesy garlic breadsticks! For the full recipe, check the details in the earlier section. To achieve a chewy breadstick, use high-gluten flour. It gives the dough strength. Knead the dough well for about five minutes. This helps develop gluten, which makes it chewy. Bake your breadsticks at 425°F (220°C). Keep an eye on them. Bake for 12 to 15 minutes. You want them golden brown and bubbly on top. If they look pale, give them a few more minutes. For extra flavor, add herbs like basil or thyme. You can even try a pinch of red pepper flakes for heat. Mix different cheeses for a richer taste. Use a blend of mozzarella and cheddar for a unique twist. Serve breadsticks warm for the best taste. They are great fresh out of the oven. Place them on a wooden board or in a basket. Add a small bowl of marinara sauce for dipping. This adds a fun touch and boosts flavor. For a finishing touch, sprinkle fresh parsley on top. It adds color and freshness to the dish. Enjoy your cheesy garlic breadsticks with friends or family! For the full recipe, check out the Cheesy Garlic Breadsticks section above. {{image_2}} You can change the cheese in your breadsticks for new flavors. Try using cheddar for a sharper taste. Gouda gives a nice, smoky flavor. If you love blue cheese, it adds a bold kick. If you're dairy-free, many options exist. Look for plant-based mozzarella or cheddar. These cheeses melt well and taste great. Nutritional yeast also adds a cheesy flavor without dairy. Want to spice things up? Add jalapeños or red pepper flakes to the garlic butter. This gives your breadsticks a nice heat. You can control how spicy you want them. Roasted garlic is another great choice. It has a sweet, mellow flavor. Just roast your garlic until soft, then mix it into the butter. This makes your breadsticks even more delicious. You can make different shapes for fun. Mini breadsticks are perfect for snacks. Roll smaller pieces of dough into thin sticks. Bake them the same way and enjoy bite-sized treats. Cheesy garlic knots are also easy to make. Cut the dough into small pieces. Roll each piece into a rope, then tie it into a knot. Brush with the garlic butter mix, sprinkle cheese on top, and bake. These knots are a delightful twist on the classic breadstick. For the full recipe, check out the Cheesy Garlic Breadsticks section. To store leftover breadsticks, let them cool completely first. Place them in an airtight container or wrap them in plastic wrap. This helps keep them fresh for up to three days. For best results, seal them well to stop air from getting in. If you want to keep them warm, you can wrap them in a clean kitchen towel. You can freeze breadsticks for longer storage. After they cool, wrap each breadstick in plastic wrap and then place them in a freezer bag. This keeps them fresh for about three months. When you're ready to eat, reheat them in the oven. Set it to 350°F (175°C) and bake for about 10-15 minutes. This will make them warm and tasty again. Check for signs of spoilage like mold or an off smell. If you see any, it’s best to toss them. To keep breadsticks fresh, store them in a cool, dry place. Avoid keeping them in the fridge, as this can dry them out. For extra freshness, enjoy them within a few days of baking. You can always refer to the Full Recipe for making more whenever you need a cheesy snack! You can make cheesy garlic breadsticks without yeast by using baking powder. Baking powder helps the dough rise quickly. For a basic no-yeast dough, use 2 cups of all-purpose flour, 1 tablespoon of baking powder, and 1 teaspoon of salt. Mix these dry ingredients first. Then, add ¾ cup of warm water and 2 tablespoons of olive oil. Mix until a dough forms and follow the same steps for shaping and baking. Yes, you can prepare the dough in advance. After mixing, cover it and refrigerate overnight. This allows the flavors to blend well. When ready to use, let it sit at room temperature for about 30 minutes before baking. If you have leftover dough, you can store it wrapped in plastic. Use it within two days for the best results. Popular dips include marinara sauce, ranch dressing, and garlic butter. Marinara adds a nice tang and pairs well with the cheesy flavor. For a twist, try a spicy sriracha mayo. You can also make a creamy spinach dip or a simple pesto. These dips enhance the taste and make your cheesy garlic breadsticks even more fun to eat. In this post, we covered key ingredients for cheesy garlic breadsticks and their steps. You learned how to prepare the dough, rise it, and bake it just right. We discussed tips for perfect texture, enhancing flavors, and different variations. Remember to store leftovers properly, so they stay fresh. Cheesy garlic breadsticks are fun to make and share. They pair great with dips, making them a perfect snack or side. Enjoy experimenting with different flavors and shapes to find your favorite!](https://mycookingcast.com/wp-content/uploads/2025/06/f014268d-bdac-4f9e-9ca6-06fbafbccd76-768x768.webp)
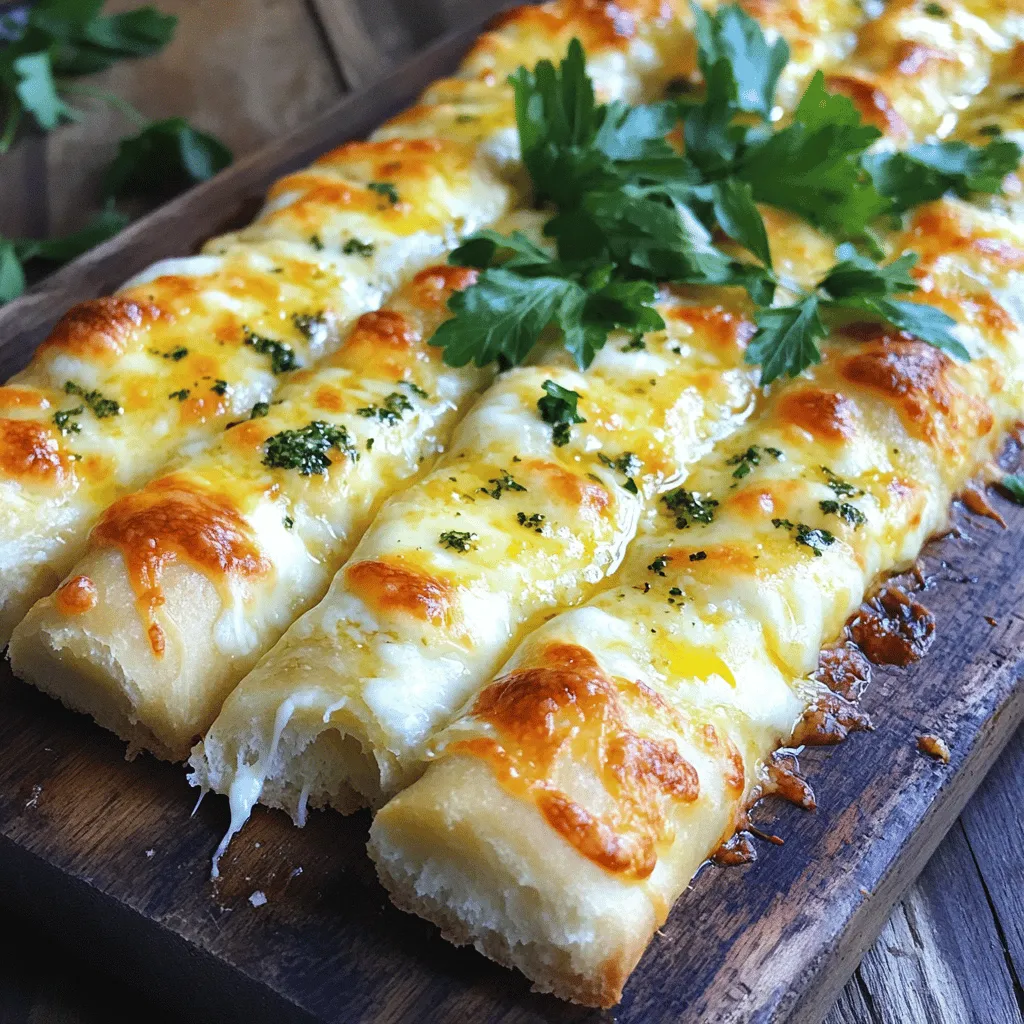
Are you craving a warm, cheesy treat? Look no further! In this post, I’ll share my favorite recipe for Cheesy Garlic Breadsticks that are sure to delight your taste buds. With just a handful of simple ingredients and easy step-by-step instructions, you can whip up these flavorful delights in no time. Plus, I’ll throw in some tips and variations to make them your own. Let’s get started on this cheesy journey!
Ingredients
Key Ingredients
– 1 cup warm water
– 2 ¼ teaspoons active dry yeast
– 3 cups all-purpose flour
– 1 ½ cups shredded mozzarella cheese
The key to my cheesy garlic breadsticks starts with warm water. Use about 110°F to wake up your yeast. Then, mix the yeast with sugar and let it froth for about 10 minutes. This step helps create a soft and fluffy breadstick.
Next, I rely on all-purpose flour. This flour gives the breadsticks a great texture. Finally, mozzarella cheese adds the creamy, gooey goodness we all love.
Optional Ingredients
– Fresh parsley for garnish
– Marinara sauce for dipping
Fresh parsley is a simple touch that makes your breadsticks look pretty. It adds a pop of color and a hint of freshness. Marinara sauce is perfect for dipping and adds a nice tang to the cheesy flavor.
Common Substitutions
How to replace all-purpose flour
If you want a gluten-free option, use a gluten-free flour blend. This keeps the texture light and fluffy.
Alternatives for mozzarella cheese
You can use provolone or gouda cheese for a different taste. These cheeses melt well and offer a unique flavor twist.
Using garlic powder instead of fresh garlic
If you don’t have fresh garlic, garlic powder works fine. Use about 1 teaspoon of garlic powder for each clove. This gives your breadsticks that great garlic flavor without the fuss.
Step-by-Step Instructions
Preparing the Dough
To start, we need to activate the yeast mixture. In a small bowl, mix one cup of warm water, 2 ¼ teaspoons of active dry yeast, and one teaspoon of sugar. Let this sit for 5 to 10 minutes. You will see it foam up, which means your yeast is alive!
Next, combine 3 cups of all-purpose flour and one teaspoon of salt in a large mixing bowl. Make a well in the center. Pour in your yeast mixture along with 2 tablespoons of olive oil. Mix until a dough forms.
Now, knead the dough on a floured surface for about 5 minutes. You want it to feel smooth and elastic. This step is important for the right texture.
Rising the Dough
After kneading, place your dough in a lightly greased bowl. Cover it with a kitchen towel. Let it rise in a warm place for about 1 hour. You want it to double in size. Look for a cozy spot like near a warm oven.
Shaping and Baking
Once the dough has risen, punch it down gently. Now, roll it out into a rectangle that is about ½ inch thick on a floured surface. This is where the magic begins!
Transfer the rolled dough to a baking sheet lined with parchment paper. Use a knife or pizza cutter to score the dough into sticks. Be careful not to cut all the way through.
In a small bowl, mix together 3 tablespoons of melted butter, 4 cloves of minced garlic, and 1 teaspoon of dried oregano. Brush this garlic butter mixture generously over the dough.
Finally, sprinkle 1 ½ cups of shredded mozzarella and ¼ cup of grated Parmesan cheese evenly on top.
Preheat your oven to 425°F (220°C) and bake for 12 to 15 minutes. Look for golden edges and bubbly cheese. Once done, let the breadsticks cool for a few minutes before cutting through the scored lines.
Now you can enjoy your cheesy garlic breadsticks!
Tips & Tricks
Perfecting the Texture
To achieve a chewy breadstick, use high-gluten flour. It gives the dough strength. Knead the dough well for about five minutes. This helps develop gluten, which makes it chewy.
Bake your breadsticks at 425°F (220°C). Keep an eye on them. Bake for 12 to 15 minutes. You want them golden brown and bubbly on top. If they look pale, give them a few more minutes.
Enhancing Flavor
For extra flavor, add herbs like basil or thyme. You can even try a pinch of red pepper flakes for heat. Mix different cheeses for a richer taste. Use a blend of mozzarella and cheddar for a unique twist.
Serving Suggestions
Serve breadsticks warm for the best taste. They are great fresh out of the oven. Place them on a wooden board or in a basket. Add a small bowl of marinara sauce for dipping. This adds a fun touch and boosts flavor.
For a finishing touch, sprinkle fresh parsley on top. It adds color and freshness to the dish. Enjoy your cheesy garlic breadsticks with friends or family!
Variations
Cheese Variations
You can change the cheese in your breadsticks for new flavors. Try using cheddar for a sharper taste. Gouda gives a nice, smoky flavor. If you love blue cheese, it adds a bold kick.
If you’re dairy-free, many options exist. Look for plant-based mozzarella or cheddar. These cheeses melt well and taste great. Nutritional yeast also adds a cheesy flavor without dairy.
Flavor Additions
Want to spice things up? Add jalapeños or red pepper flakes to the garlic butter. This gives your breadsticks a nice heat. You can control how spicy you want them.
Roasted garlic is another great choice. It has a sweet, mellow flavor. Just roast your garlic until soft, then mix it into the butter. This makes your breadsticks even more delicious.
Alternate Shapes and Sizes
You can make different shapes for fun. Mini breadsticks are perfect for snacks. Roll smaller pieces of dough into thin sticks. Bake them the same way and enjoy bite-sized treats.
Cheesy garlic knots are also easy to make. Cut the dough into small pieces. Roll each piece into a rope, then tie it into a knot. Brush with the garlic butter mix, sprinkle cheese on top, and bake. These knots are a delightful twist on the classic breadstick.
Storage Info
Short-term Storage
To store leftover breadsticks, let them cool completely first. Place them in an airtight container or wrap them in plastic wrap. This helps keep them fresh for up to three days. For best results, seal them well to stop air from getting in. If you want to keep them warm, you can wrap them in a clean kitchen towel.
Long-term Storage
You can freeze breadsticks for longer storage. After they cool, wrap each breadstick in plastic wrap and then place them in a freezer bag. This keeps them fresh for about three months. When you’re ready to eat, reheat them in the oven. Set it to 350°F (175°C) and bake for about 10-15 minutes. This will make them warm and tasty again.
Freshness Tips
Check for signs of spoilage like mold or an off smell. If you see any, it’s best to toss them. To keep breadsticks fresh, store them in a cool, dry place. Avoid keeping them in the fridge, as this can dry them out. For extra freshness, enjoy them within a few days of baking.
FAQs
How to make cheesy garlic breadsticks without yeast?
You can make cheesy garlic breadsticks without yeast by using baking powder. Baking powder helps the dough rise quickly. For a basic no-yeast dough, use 2 cups of all-purpose flour, 1 tablespoon of baking powder, and 1 teaspoon of salt. Mix these dry ingredients first. Then, add ¾ cup of warm water and 2 tablespoons of olive oil. Mix until a dough forms and follow the same steps for shaping and baking.
Can I prepare the dough in advance?
Yes, you can prepare the dough in advance. After mixing, cover it and refrigerate overnight. This allows the flavors to blend well. When ready to use, let it sit at room temperature for about 30 minutes before baking. If you have leftover dough, you can store it wrapped in plastic. Use it within two days for the best results.
What are the best dips for cheesy garlic breadsticks?
Popular dips include marinara sauce, ranch dressing, and garlic butter. Marinara adds a nice tang and pairs well with the cheesy flavor. For a twist, try a spicy sriracha mayo. You can also make a creamy spinach dip or a simple pesto. These dips enhance the taste and make your cheesy garlic breadsticks even more fun to eat.
In this post, we covered key ingredients for cheesy garlic breadsticks and their steps. You learned how to prepare the dough, rise it, and bake it just right. We discussed tips for perfect texture, enhancing flavors, and different variations. Remember to store leftovers properly, so they stay fresh. Cheesy garlic breadsticks are fun to make and share. They pair great with dips, making them a perfect snack or side. Enjoy experimenting with different flavors and shapes to find your favorite!
![- 1 cup warm water - 2 ¼ teaspoons active dry yeast - 3 cups all-purpose flour - 1 ½ cups shredded mozzarella cheese The key to my cheesy garlic breadsticks starts with warm water. Use about 110°F to wake up your yeast. Then, mix the yeast with sugar and let it froth for about 10 minutes. This step helps create a soft and fluffy breadstick. Next, I rely on all-purpose flour. This flour gives the breadsticks a great texture. Finally, mozzarella cheese adds the creamy, gooey goodness we all love. - Fresh parsley for garnish - Marinara sauce for dipping Fresh parsley is a simple touch that makes your breadsticks look pretty. It adds a pop of color and a hint of freshness. Marinara sauce is perfect for dipping and adds a nice tang to the cheesy flavor. How to replace all-purpose flour If you want a gluten-free option, use a gluten-free flour blend. This keeps the texture light and fluffy. Alternatives for mozzarella cheese You can use provolone or gouda cheese for a different taste. These cheeses melt well and offer a unique flavor twist. Using garlic powder instead of fresh garlic If you don’t have fresh garlic, garlic powder works fine. Use about 1 teaspoon of garlic powder for each clove. This gives your breadsticks that great garlic flavor without the fuss. For the full recipe, check out the [Full Recipe]. To start, we need to activate the yeast mixture. In a small bowl, mix one cup of warm water, 2 ¼ teaspoons of active dry yeast, and one teaspoon of sugar. Let this sit for 5 to 10 minutes. You will see it foam up, which means your yeast is alive! Next, combine 3 cups of all-purpose flour and one teaspoon of salt in a large mixing bowl. Make a well in the center. Pour in your yeast mixture along with 2 tablespoons of olive oil. Mix until a dough forms. Now, knead the dough on a floured surface for about 5 minutes. You want it to feel smooth and elastic. This step is important for the right texture. After kneading, place your dough in a lightly greased bowl. Cover it with a kitchen towel. Let it rise in a warm place for about 1 hour. You want it to double in size. Look for a cozy spot like near a warm oven. Once the dough has risen, punch it down gently. Now, roll it out into a rectangle that is about ½ inch thick on a floured surface. This is where the magic begins! Transfer the rolled dough to a baking sheet lined with parchment paper. Use a knife or pizza cutter to score the dough into sticks. Be careful not to cut all the way through. In a small bowl, mix together 3 tablespoons of melted butter, 4 cloves of minced garlic, and 1 teaspoon of dried oregano. Brush this garlic butter mixture generously over the dough. Finally, sprinkle 1 ½ cups of shredded mozzarella and ¼ cup of grated Parmesan cheese evenly on top. Preheat your oven to 425°F (220°C) and bake for 12 to 15 minutes. Look for golden edges and bubbly cheese. Once done, let the breadsticks cool for a few minutes before cutting through the scored lines. Now you can enjoy your cheesy garlic breadsticks! For the full recipe, check the details in the earlier section. To achieve a chewy breadstick, use high-gluten flour. It gives the dough strength. Knead the dough well for about five minutes. This helps develop gluten, which makes it chewy. Bake your breadsticks at 425°F (220°C). Keep an eye on them. Bake for 12 to 15 minutes. You want them golden brown and bubbly on top. If they look pale, give them a few more minutes. For extra flavor, add herbs like basil or thyme. You can even try a pinch of red pepper flakes for heat. Mix different cheeses for a richer taste. Use a blend of mozzarella and cheddar for a unique twist. Serve breadsticks warm for the best taste. They are great fresh out of the oven. Place them on a wooden board or in a basket. Add a small bowl of marinara sauce for dipping. This adds a fun touch and boosts flavor. For a finishing touch, sprinkle fresh parsley on top. It adds color and freshness to the dish. Enjoy your cheesy garlic breadsticks with friends or family! For the full recipe, check out the Cheesy Garlic Breadsticks section above. {{image_2}} You can change the cheese in your breadsticks for new flavors. Try using cheddar for a sharper taste. Gouda gives a nice, smoky flavor. If you love blue cheese, it adds a bold kick. If you're dairy-free, many options exist. Look for plant-based mozzarella or cheddar. These cheeses melt well and taste great. Nutritional yeast also adds a cheesy flavor without dairy. Want to spice things up? Add jalapeños or red pepper flakes to the garlic butter. This gives your breadsticks a nice heat. You can control how spicy you want them. Roasted garlic is another great choice. It has a sweet, mellow flavor. Just roast your garlic until soft, then mix it into the butter. This makes your breadsticks even more delicious. You can make different shapes for fun. Mini breadsticks are perfect for snacks. Roll smaller pieces of dough into thin sticks. Bake them the same way and enjoy bite-sized treats. Cheesy garlic knots are also easy to make. Cut the dough into small pieces. Roll each piece into a rope, then tie it into a knot. Brush with the garlic butter mix, sprinkle cheese on top, and bake. These knots are a delightful twist on the classic breadstick. For the full recipe, check out the Cheesy Garlic Breadsticks section. To store leftover breadsticks, let them cool completely first. Place them in an airtight container or wrap them in plastic wrap. This helps keep them fresh for up to three days. For best results, seal them well to stop air from getting in. If you want to keep them warm, you can wrap them in a clean kitchen towel. You can freeze breadsticks for longer storage. After they cool, wrap each breadstick in plastic wrap and then place them in a freezer bag. This keeps them fresh for about three months. When you're ready to eat, reheat them in the oven. Set it to 350°F (175°C) and bake for about 10-15 minutes. This will make them warm and tasty again. Check for signs of spoilage like mold or an off smell. If you see any, it’s best to toss them. To keep breadsticks fresh, store them in a cool, dry place. Avoid keeping them in the fridge, as this can dry them out. For extra freshness, enjoy them within a few days of baking. You can always refer to the Full Recipe for making more whenever you need a cheesy snack! You can make cheesy garlic breadsticks without yeast by using baking powder. Baking powder helps the dough rise quickly. For a basic no-yeast dough, use 2 cups of all-purpose flour, 1 tablespoon of baking powder, and 1 teaspoon of salt. Mix these dry ingredients first. Then, add ¾ cup of warm water and 2 tablespoons of olive oil. Mix until a dough forms and follow the same steps for shaping and baking. Yes, you can prepare the dough in advance. After mixing, cover it and refrigerate overnight. This allows the flavors to blend well. When ready to use, let it sit at room temperature for about 30 minutes before baking. If you have leftover dough, you can store it wrapped in plastic. Use it within two days for the best results. Popular dips include marinara sauce, ranch dressing, and garlic butter. Marinara adds a nice tang and pairs well with the cheesy flavor. For a twist, try a spicy sriracha mayo. You can also make a creamy spinach dip or a simple pesto. These dips enhance the taste and make your cheesy garlic breadsticks even more fun to eat. In this post, we covered key ingredients for cheesy garlic breadsticks and their steps. You learned how to prepare the dough, rise it, and bake it just right. We discussed tips for perfect texture, enhancing flavors, and different variations. Remember to store leftovers properly, so they stay fresh. Cheesy garlic breadsticks are fun to make and share. They pair great with dips, making them a perfect snack or side. Enjoy experimenting with different flavors and shapes to find your favorite!](https://mycookingcast.com/wp-content/uploads/2025/06/f014268d-bdac-4f9e-9ca6-06fbafbccd76-250x250.webp)
